A mini excavator is often the first piece of genuine heavy machinery many people ever operate, rented for a weekend landscaping project, a small trenching job, or a residential renovation rather than assigned to an experienced operator on a large commercial site. That accessibility is exactly what makes a dedicated, beginner-friendly guide worthwhile, since mini excavators are simple enough to learn quickly but still powerful enough to cause serious injury or damage if operated carelessly.
This guide focuses specifically on what makes operating a mini excavator different from a full-size machine: its compact controls, tighter working envelope, and the confined or residential environments it typically works in, alongside the full operating sequence every new operator needs to understand, from the first walk-around check to switching the machine off at the end of the day.
What Makes a Mini Excavator Different to Operate?
A mini excavator, generally classified as a machine under six tonnes, shares the same basic hydraulic boom-and-bucket mechanism as its full-size counterparts, but its compact scale changes several practical aspects of how it is actually driven and controlled. A closer look at how excavators are classified by size and design is available in Types of Excavators for Construction and Earthmoving, useful context before getting into the specifics of compact models.
Size and Tail Swing Design
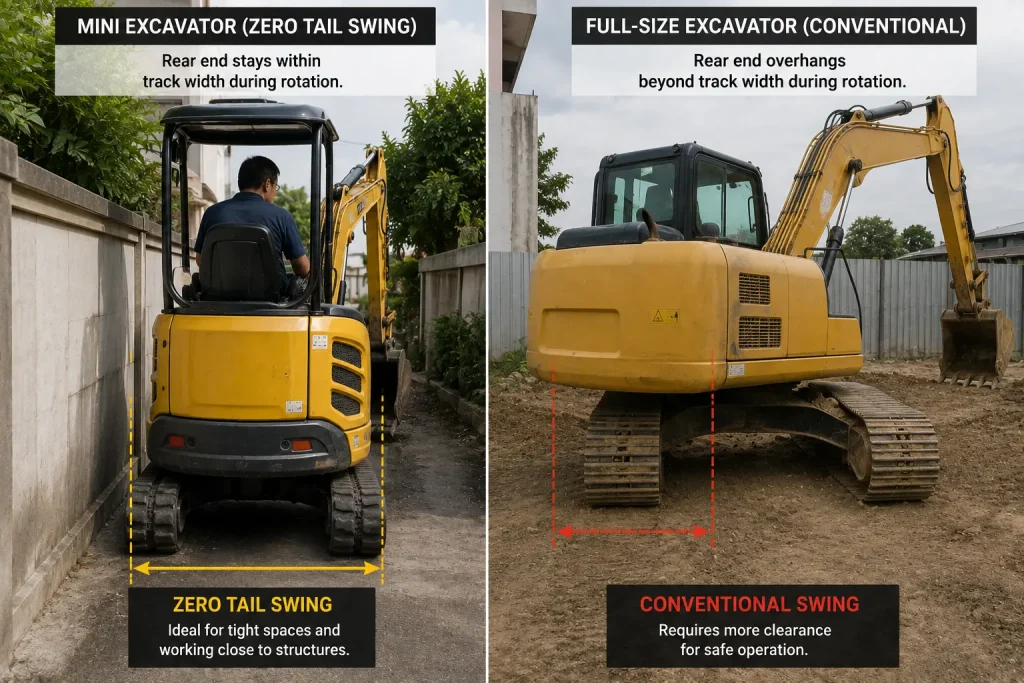
Many mini excavators are built with a zero or minimal tail swing design, meaning the rear of the rotating upper structure stays within, or very close to, the width of the tracks rather than overhanging to the side as it rotates. This design is specifically intended for working close to walls, fences, and other obstacles common on residential and confined urban sites, a genuine point of difference from most full-size excavators where tail swing clearance is a routine safety consideration.
This compact footprint also means a mini excavator can be transported on a standard trailer towed by a pickup truck or light vehicle, rather than requiring a low-loader, which is part of why they are so commonly rented by contractors and homeowners without dedicated heavy-transport logistics.
Control Types in Compact Models
Most modern mini excavators use hydraulic pilot controls operated through two joysticks, one typically controlling boom and bucket movement, the other controlling arm movement and cab rotation, though the exact layout varies between manufacturers and can usually be switched between two common industry patterns. Foot pedals or hand levers control the tracks for travel, and a separate pedal or lever typically operates a hydraulic auxiliary circuit for attachments such as augers or breakers.
Because control layouts are not fully standardised across brands, the single most important first step for any new operator is confirming the specific control pattern of the machine in front of them rather than assuming it matches a different model they may have used before.
Also read: Types of Excavators for Construction and Earthmoving
Before You Start: Pre-Operation Checks
Before starting the engine, a few checks take only a couple of minutes but catch the majority of issues that would otherwise cause a problem partway through a task:
- Walk around the machine checking for visible hydraulic leaks, damaged tracks, or loose fittings
- Confirm the bucket and any attached tooling are securely pinned in place
- Check engine oil, hydraulic fluid, and fuel levels before starting
- Adjust the seat and mirrors, and confirm the seatbelt is functional before operating
- Test all controls at idle in a clear area before beginning actual work
- Confirm the emergency stop and safety lockout function correctly
Skipping this check because a task feels small or the machine looks fine at a glance is one of the most common ways an avoidable fault goes unnoticed until it causes a real problem.
Checking for Underground Services Before You Dig
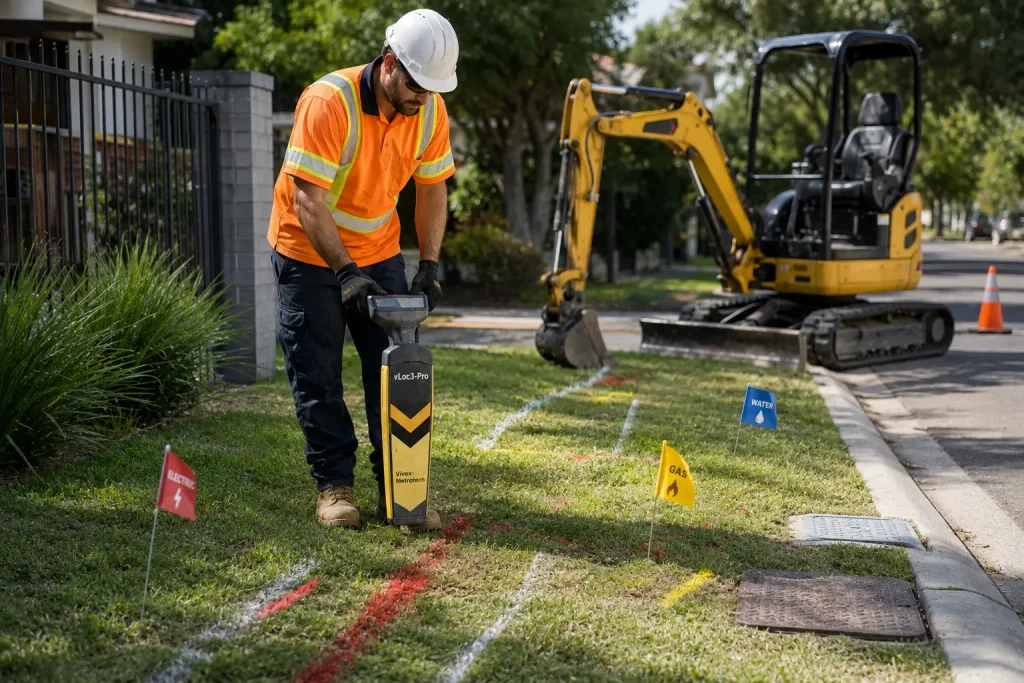
Even a small trench dug by a mini excavator can strike a gas line, electrical cable, or water main, and this risk is often higher on residential and urban sites than on open construction sites, simply because more services tend to run through smaller, older, or less-documented ground. Before the bucket touches the ground at a new location:
- Check any available site plans or utility records for known service locations
- Look for visible surface indicators such as service markers, valve covers, or inspection chambers
- If there is any uncertainty, especially near buildings, driveways, or roads, arrange a cable and utility locating service, or hand-dig a trial pit to confirm what lies beneath before mechanical digging begins
Singapore’s Ministry of Manpower and utility providers publish guidance on checking for underground services before excavation work, and this step applies just as much to a small residential job as it does to a large civil works site. Skipping it because the job “feels minor” is one of the most common causes of a preventable utility strike.
Learning the Controls
Spending time simply practising control movements in an open, obstacle-free area before attempting any real digging is the single most effective way to build the muscle memory needed to operate a mini excavator smoothly and safely. Rushing straight into a task without this practice period is a common mistake among first-time operators, and it is usually the reason early attempts at digging look jerky or imprecise rather than smooth and controlled.
Travel Controls
Track travel is typically controlled by two levers or pedals, one per track, pushed forward or pulled back to drive, turn, or pivot the machine on the spot by running the tracks in opposite directions. New operators should practise slow, deliberate travel movements in an open area first, since overcorrecting is common when first getting a feel for how sensitive the controls are.
Travel speed should always be kept low while learning, and operators should never travel with the boom raised or extended, since this significantly raises the machine’s centre of gravity and increases tip-over risk.
Boom, Arm, and Bucket Controls
The joystick controlling the boom and bucket typically moves the boom up and down with forward and backward joystick motion, and curls or extends the bucket with side-to-side motion, while the second joystick controls the arm’s extension and the cab’s rotation. Learning to coordinate these two joysticks together, rather than moving one function at a time, is what eventually produces the smooth, continuous digging motion experienced operators use.
New operators should expect this coordination to feel unnatural at first, and should practise each function individually before attempting to combine them, rather than trying to dig immediately with limited familiarity with how each control responds.
Auxiliary and Attachment Controls
Many mini excavators include an auxiliary hydraulic circuit, controlled by a separate pedal, thumbwheel, or button, used to power attachments beyond the standard digging bucket. This is one of the most practical advantages of a mini excavator for rental and residential use, since a single machine can be quickly switched between tasks by changing the attachment rather than bringing in different equipment:
- Augers for digging post holes for fencing or decking, where auxiliary flow direction usually needs to rotate the auger clockwise to bore into the ground
- Hydraulic breakers for small demolition tasks such as removing a concrete slab or old paving
- Grapples for handling loose material, rubble, or vegetation
Auxiliary flow direction can often be reversed at the control panel or valve block, an important detail for attachments like augers that need to rotate in a specific direction to function correctly. Operators switching between a standard bucket and a powered attachment should also confirm the quick-coupler or pin is fully secured before starting work, since an incorrectly configured circuit or a partially locked attachment can cause unexpected or dangerous behaviour the moment it is engaged.
Positioning the Machine Before You Dig
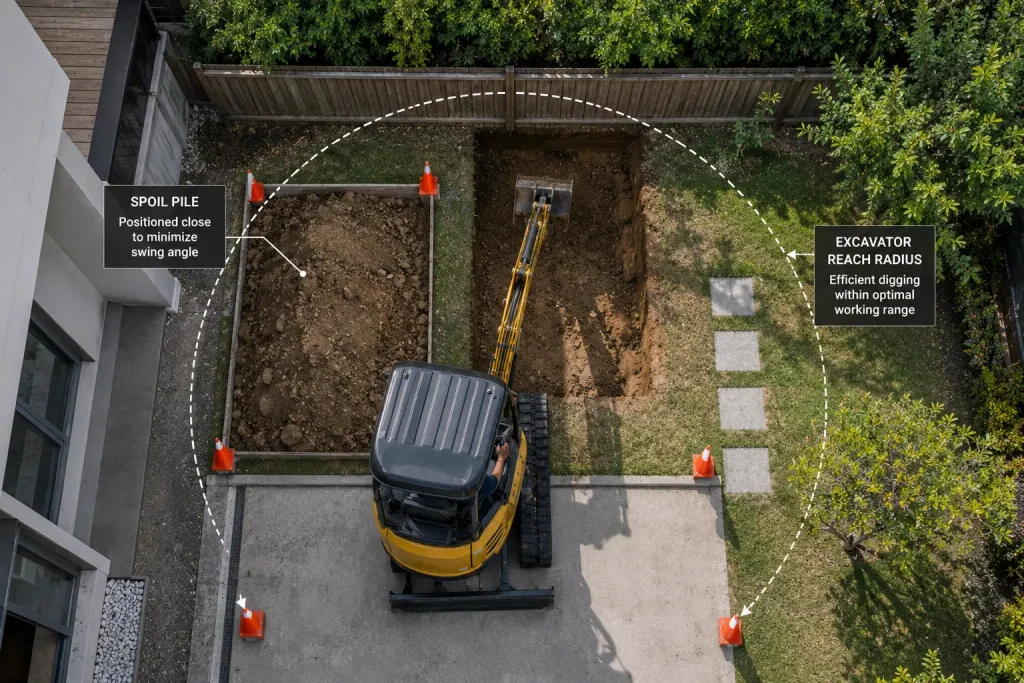
Where the machine is placed before digging begins has a bigger effect on how smoothly a task goes than most first-time operators expect, and getting it wrong is one of the most common reasons a small job takes far longer than it should.
- Keep the dig area within comfortable reach. Working right at the machine’s maximum reach reduces digging force and makes the bucket harder to control precisely, while working too close forces constant repositioning. Aim to keep the digging point within roughly two-thirds of the machine’s maximum reach.
- Minimise the swing angle to the dump point. Position any spoil pile, wheelbarrow, or truck as close to directly beside the dig area as the site allows, rather than requiring a wide swing of the cab each time the bucket is full. A smaller swing angle means less time per cycle and less strain on the machine.
- Check the ground the machine itself is standing on. Confirm the ground beneath the tracks is firm and reasonably level before starting, and be cautious near the edge of any excavation, retaining wall, or slope, soft or unsupported ground can shift under the machine’s weight even at mini excavator scale.
- Plan for confined-space obstacles in advance. In a tight backyard or side passage, walk the intended swing path before starting the engine, checking overhead clearance for eaves, cables, or branches, and side clearance for fences and walls.
Taking a few minutes to think through positioning before the first bucket load is far cheaper than repositioning the machine repeatedly, or worse, working in a position that compromises stability.
Step-by-Step Operating Sequence
With the controls understood and the machine positioned, digging with a mini excavator follows a consistent sequence that, once practised, becomes largely automatic.
Digging Technique
A typical digging motion starts by positioning the bucket teeth against the ground at a slight angle, curling the bucket inward while simultaneously drawing the arm toward the machine to break and collect material, then lifting the boom once the bucket is full. Digging in smaller, controlled bites rather than attempting to fill the bucket in a single aggressive pass produces a cleaner trench profile and puts less strain on the machine’s hydraulics.
Keeping the cut consistent in depth and width as the trench progresses takes practice, and new operators often find it easier to dig in short sections, checking progress regularly, rather than attempting to judge an entire trench length in one continuous pass.
Loading and Dumping
Once the bucket is full, rotating the cab toward the drop-off point, whether a waiting truck, a spoil pile, or simply an adjacent area, and then extending the arm slightly before curling the bucket open releases the material in a controlled manner rather than dropping it abruptly. Positioning the bucket close to the drop point before opening it reduces spillage and avoids unnecessary strain on the boom from swinging a loaded bucket further than necessary.
Repeating this cycle, dig, rotate, dump, return, smoothly and consistently is the core skill that separates an efficient operator from one who is still learning, and it typically comes together after a relatively short period of focused practice.
Also read: How to Operate an Excavator: A Step-by-Step Guide
Working in Confined or Residential Spaces
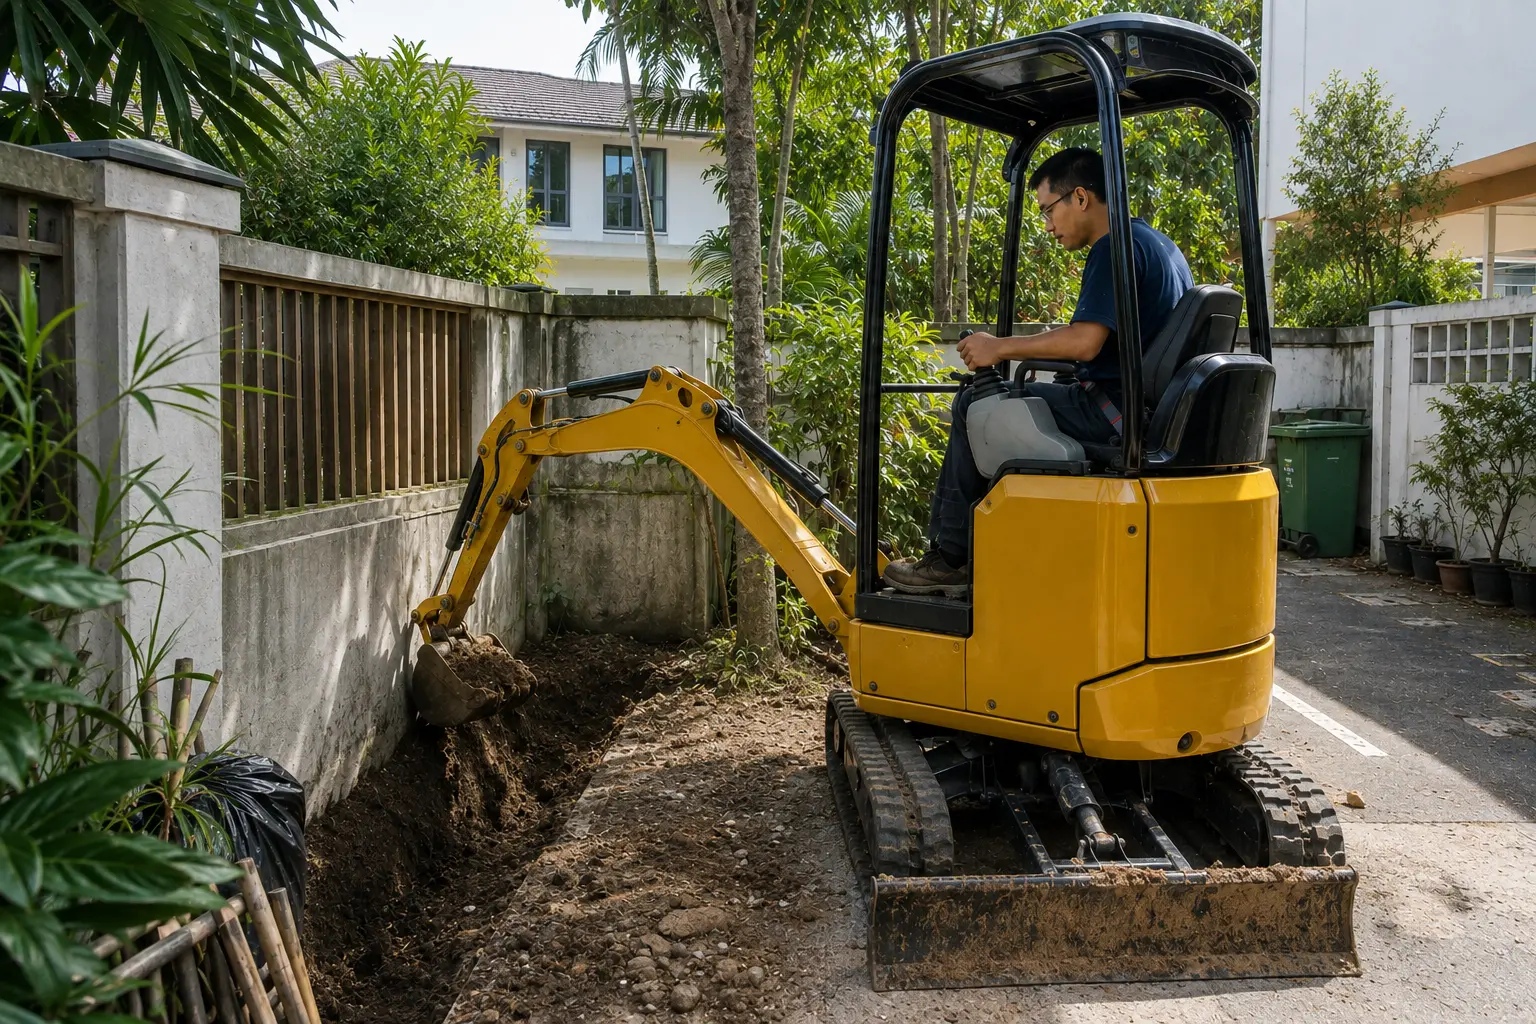
One of the most common real-world uses for a mini excavator is exactly the kind of confined, obstacle-heavy environment a full-size machine could never access, tight residential backyards, narrow side passages, or indoor demolition work. Operating in these environments requires more attention to swing radius, overhead clearance, and nearby structures than open-site work typically demands, even with a zero tail swing model, since the bucket and arm themselves still extend well beyond the machine’s body during normal operation.
Taking extra time to plan the machine’s position and swing path before starting work in a tight space prevents the kind of accidental contact with fences, walls, or utility lines that is far more likely in confined conditions than on an open site.
Safety Considerations Specific to Mini Excavators
Mini excavators are sometimes treated as less serious equipment simply because of their smaller size, an assumption that leads to genuine complacency and, occasionally, serious incidents.
Tip-Over Risk on Uneven Ground
Despite their compact size, mini excavators can tip over surprisingly easily on sloped or uneven ground, particularly when the boom is extended or rotated to the side rather than kept aligned with the tracks. Operators should always assess ground conditions before positioning the machine, and avoid working across a slope where possible, positioning the machine to work up or down a gradient instead of side-on to it.
Working Near Pedestrians and Structures
A mini excavator’s compact size can create a false impression of reduced risk to people working nearby, but the machine’s swing radius, digging force, and weight remain entirely capable of causing serious injury. Maintaining a clear exclusion zone around the machine during operation, and never allowing anyone within the swing radius while the machine is running, is essential regardless of how small or routine a task might seem.
Singapore’s Ministry of Manpower publishes detailed Workplace Safety and Health guidance covering training and operating standards that apply to excavators of all sizes, including compact and mini models used on smaller residential and commercial projects. A broader overview of safety principles that apply across all categories of heavy equipment is available in Heavy Equipment Safety: A Complete Site Guide, essential reading regardless of whether the machine on-site is a compact model or a full-size excavator.
Shutting Down the Machine Correctly
How a mini excavator is switched off matters almost as much as how it is operated, and it is a step first-time users frequently skip entirely simply because they don’t know it exists.
- Park the machine on firm, level ground wherever possible, rather than leaving it on a slope or soft ground overnight
- Lower the boom, arm, and bucket fully so the bucket rests flat on the ground, taking all load off the hydraulic cylinders
- Let the engine idle for a minute or two before switching off, this allows the engine to cool evenly rather than being stopped abruptly under load
- Return all joysticks and pedals to the neutral position before removing the key
- Engage any parking or travel lock if the machine has one, and remove the key
- If the machine is left on a residential or public site, take basic security steps, such as raising the bucket slightly off the ground and locking the cab, to discourage tampering or unauthorised use
Leaving a mini excavator with the bucket raised, hydraulics still under pressure, or parked on unstable ground is a common but entirely avoidable way for an otherwise uneventful job to end with a damaged machine or a safety incident overnight.
Build Confidence Before You Dig
Operating a mini excavator safely comes down to understanding its specific controls, checking for underground services and planning its position before digging, practising in an open area before attempting real work, and taking its tip-over and swing radius risks just as seriously as you would on a larger machine, right through to switching it off correctly at the end of the job. Further technical background on how compact excavators are classified and designed is available through Wikipedia’s overview of mini excavators, useful additional context for new operators researching equipment options.
RR Machinery Pte Ltd supports Singapore’s construction and industrial sectors with reliable heavy machinery solutions and expert guidance for operators at every experience level. Browse our complete heavy machinery services or contact our team today for practical advice on the right equipment for your project.