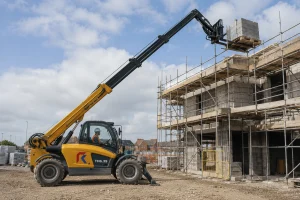
The excavator is the most versatile and widely deployed machine in construction. It digs foundations, trenches, and drainage channels. It loads trucks, breaks concrete, drives piles, grades slopes, and handles materials. No other single machine performs as many distinct tasks on an active construction site, and no other machine is as consistently present across every phase of civil engineering and building work, from the first cut into the ground to the final site tidy-up.
Operating an excavator correctly is a skill that takes time, practice, and formal training to develop. The machine’s combination of 360-degree slewing, simultaneous multi-axis hydraulic control, and the precision required for productive and safe digging makes it one of the more demanding machines to operate well. But the foundation, the pre-use inspection, the basic controls, the correct sequence for digging and loading, the safety rules that protect the operator and everyone around the machine, is learnable, and this guide sets it out systematically.
This guide covers the complete process of operating a crawler excavator: the pre-use inspection, the machine’s controls and their functions, the step-by-step procedure for digging and loading, travelling on site, working on slopes, and the safety requirements that apply throughout every operating session.
Excavator Operator Certification
Before addressing the mechanics of how to operate an excavator, the most important point must be stated clearly: operating an excavator without appropriate training and certification is prohibited under workplace safety legislation in most jurisdictions and is a direct cause of preventable incidents.
Excavator operator certification is a structured training process through which operators learn not just how to move the controls, but why correct technique matters, why an excavator can tip when travelling on a slope with the boom extended, why the blind spots around the machine are where the most serious incidents occur, why the bucket must be curled before the boom is raised, and why ground assessment before positioning the machine is not optional.
In Singapore, the Workplace Safety and Health Act and its subsidiary legislation require excavator operators to hold a Certificate of Competency (COC) issued by an accredited training provider before operating an excavator on any worksite. The Workplace Safety and Health Council (WSH Council) publishes the regulatory framework and accredited training requirements for excavator operators in Singapore, the authoritative reference for certification requirements in the region.
This guide is a practical operational reference for trained and certified operators, and a preparation resource for those undertaking initial certification training. It does not replace formal certified training.
Also read : Bulldozer vs Excavator: Differences and When to Use Each
Understanding the Excavator’s Controls
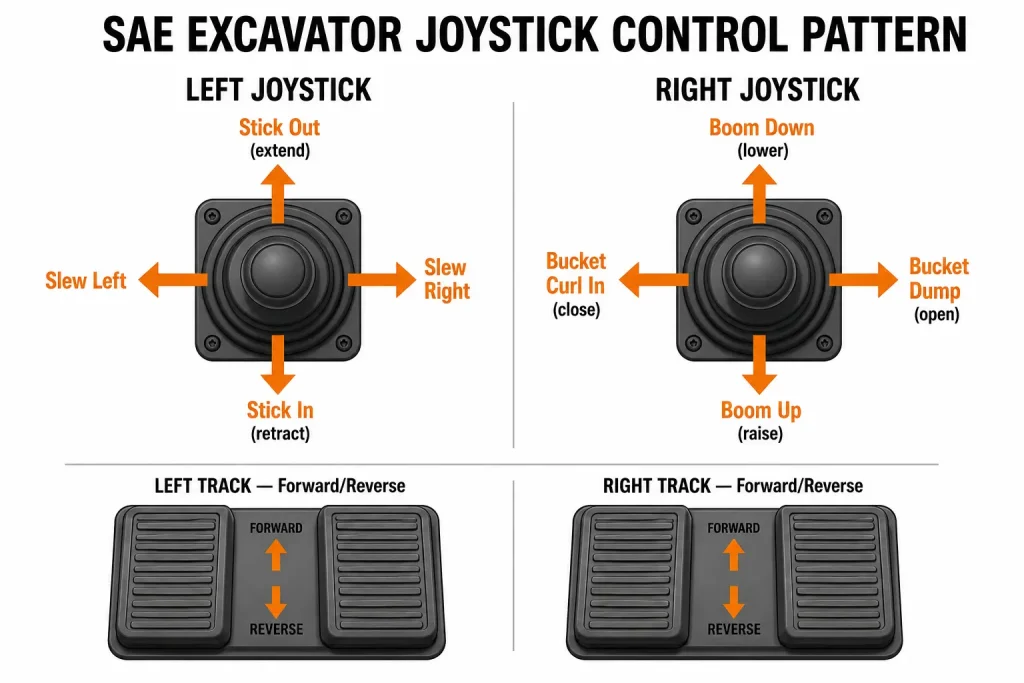
The crawler excavator is controlled through two independent joysticks, one in each hand, and two foot pedals. Most modern excavators follow the SAE (Society of Automotive Engineers) control pattern, the most widely used standard internationally, though the ISO pattern is also used. Operators must confirm the control pattern of any specific machine before operating it, as using the wrong pattern assumption on an unfamiliar machine causes serious operational errors.
Under the SAE pattern:
- Left joystick
Controls the upper structure slew (left-right rotation of the superstructure) and the dipper arm (stick), push forward to curl the stick out, pull back to curl the stick in. Moving the joystick left or right slews the superstructure left or right.
- Right joystick
Controls the boom (up and down) and the bucket, pull back to raise the boom, push forward to lower the boom. Moving the joystick left curls the bucket in (closes the bucket), moving it right curls the bucket out (opens/dumps the bucket).
- Left foot pedal
Controls the left track travel, forward and reverse.
- Right foot pedal
Controls the right track travel, forward and reverse. Pressing both pedals forward simultaneously drives the machine forward in a straight line; pressing both backward reverses the machine. Pressing one forward and one backward spins the machine on the spot.
- Thumb controls and auxiliary circuits
Most excavators have additional thumb buttons or switches on the joysticks controlling the horn, the auxiliary hydraulic circuit (for attachments such as hydraulic breakers), and, on some models, the quick-coupler for attachment changes.
The simultaneous, coordinated use of both joysticks to achieve smooth, efficient digging technique, curling the bucket while bringing the stick in while raising the boom in a single fluid motion, is the skill that separates a productive operator from an inefficient one, and it comes only with practice.
How to Operate an Excavator: The Operating Procedure
The following steps cover the complete operating procedure for a crawler excavator, from pre-use inspection before the first operation of the shift to correct shutdown at the end. Each step must be followed in sequence.
Pre-Use Inspection
No excavator should be operated without a pre-use inspection completed by the operator before each shift. The inspection identifies defects that have developed since the last use and prevents those defects from causing incidents during operation.
- Undercarriage and tracks
Walk around the machine and inspect the tracks for damaged track pads, broken links, correct tension, and missing track shoes. Check the sprocket and idler wheels for damage and excessive wear. Loose or damaged tracks are a significant safety risk, the machine can shed a track during travel or operation, causing loss of control.
- Hydraulic system
Inspect all visible hydraulic hoses, cylinders, and fittings for leaks. Check the hydraulic oil level in the reservoir. Hydraulic leaks on an operating machine create fire risk from oil contacting hot exhaust components, and cause progressive loss of control capability as hydraulic pressure drops.
- Boom, stick, and bucket
Inspect the boom and stick structural members for cracks and deformation. Check the bucket teeth, worn or missing teeth reduce digging efficiency and should be replaced before the teeth wear back to the adaptor. Check all bucket pins and retaining clips, a pin failure during operation drops the bucket unexpectedly.
- Engine compartment
Check engine oil, coolant level, and fuel level. Check the air filter restriction indicator if fitted. Inspect the engine compartment for oil leaks, coolant leaks, and any debris accumulation near hot exhaust components.
- Cab and controls
Enter the cab and confirm that all controls move freely and return to neutral. Test the horn. Confirm that all warning indicators on the instrument panel are clear, no fault codes, no warning lights. Adjust mirrors to give maximum visibility around the machine.
- Record the inspection
Log the findings in the pre-use inspection record. Any defect that affects safe operation must be reported and the machine must be taken out of service until rectified. The pre-use inspection discipline that applies to excavators is consistent across all categories of heavy plant, as set out in the practical guide to heavy equipment safety and equipment inspection requirements.
Starting and Warming Up
Start the engine with the joysticks in the neutral position and the track pedals at rest. Allow the engine to idle for two to five minutes before applying load to the hydraulic system, cold hydraulic oil is thick and does not flow efficiently through the system’s small orifices and control valves. Operating a cold hydraulic system under full load causes excessive pressure drop and can damage seals.
During the warm-up period, move the boom, stick, and bucket through their full range of movement at low speed to circulate warm oil through all circuits. Check that all movements are smooth and responsive before beginning work.
Positioning the Machine
Positioning the excavator correctly before digging begins is one of the most productivity-critical decisions in excavator operation, and one of the most frequently underestimated by inexperienced operators.
Position the machine so that the digging area is within the optimal working radius, typically 60 to 70 percent of the machine’s maximum reach. Working at maximum reach reduces digging force significantly and increases cycle time. Working too close requires frequent machine repositioning.
Position the machine so that the truck or the spoil dump is within 90 to 120 degrees of slew from the digging position, the slew angle is one of the largest components of the digging cycle time. A slew angle of more than 120 degrees significantly reduces the machine’s hourly output.
Position the undercarriage so that the drive sprockets are at the rear of the machine, away from the digging face. If the machine must travel into the excavation or near the edge of the cut, the sprockets-to-the-rear orientation provides better protection to the more vulnerable sprocket components.
Confirm the ground conditions at the machine position, bearing capacity, proximity to excavation edges, overhead hazards, and underground services, before beginning work. Positioning an excavator on inadequate ground, too close to an unsupported excavation edge, or beneath an overhead power line are among the most dangerous errors in excavator deployment. Ground assessment principles that apply to excavator positioning are the same as those that apply to crane position assessment, as covered in the guide to lifting equipment safety and ground bearing capacity for construction plant.
Also read : Front End Loader vs Bulldozer: Key Differences Explained
The Basic Digging Cycle
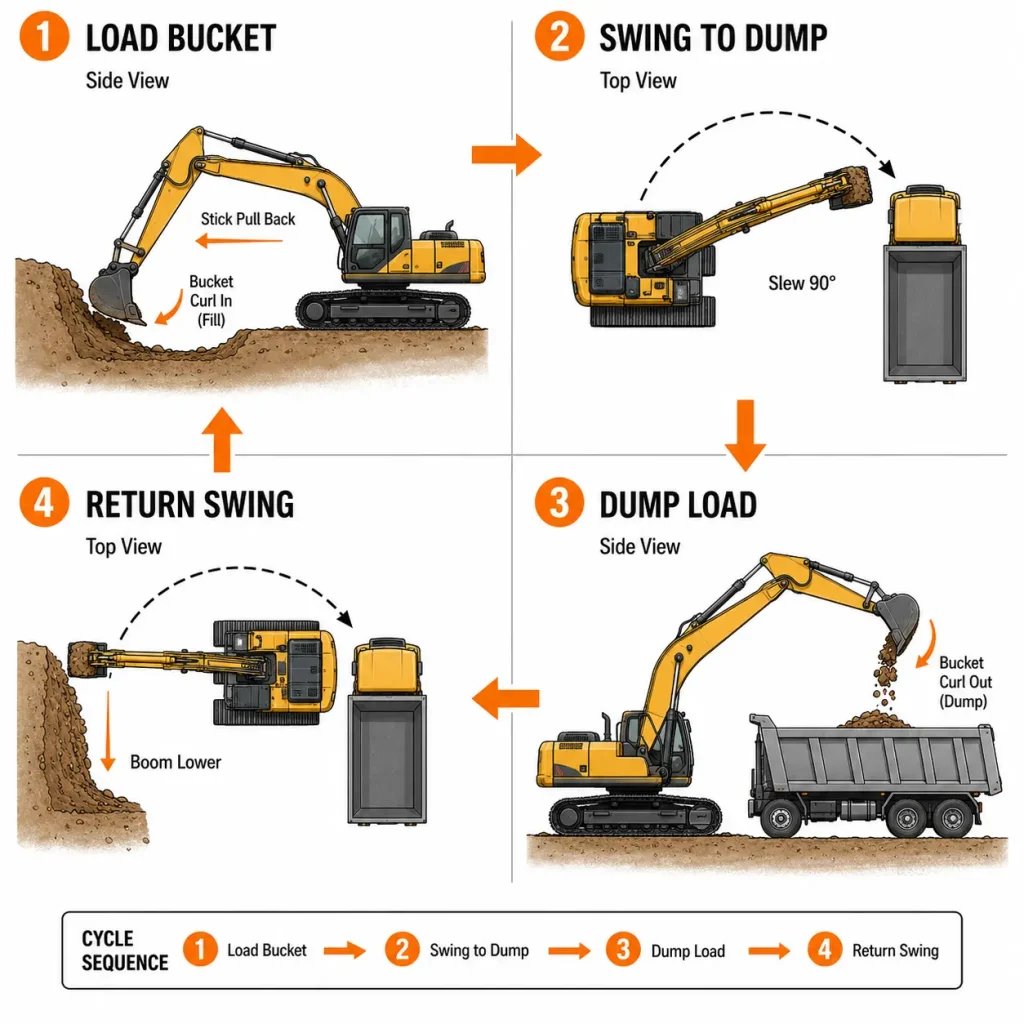
The excavator’s digging cycle has four phases: loading the bucket, swinging to the dump, dumping the load, and swinging back to the dig position.
- Loading the bucket
Lower the boom to bring the bucket to the dig level. Curl the bucket out (open) and push the stick away to position the bucket at the start of the cut. Lower the boom to engage the bucket teeth with the material. Pull the stick back toward the machine while simultaneously curling the bucket in, this combination of stick and bucket movement fills the bucket in a smooth, controlled arc. As the bucket fills, raise the boom to maintain ground engagement pressure without dragging the teeth below the cut grade.
A productive digging technique is smooth and continuous, the bucket fills progressively as the stick pulls back and the bucket curls in, without jerky movements or sudden changes in direction that shock-load the hydraulic system and the machine structure. Operating the machine smoothly also reduces fuel consumption and slows the rate of hydraulic component wear.
- Swing to dump
Once the bucket is full and curled in, raise the boom slightly to clear the excavation edge and slew the superstructure toward the dump position, truck body, spoil pile, or stockpile. Slewing and boom raising can be performed simultaneously to reduce cycle time.
- Dumping
Position the bucket over the dump point and curl the bucket out to release the load. On truck loading, the bucket should be positioned with the cutting edge over the truck body before dumping, dropping material from excessive height damages the truck body and creates dust. Lower the bucket progressively to minimise drop height.
- Return swing
Slew back to the digging position simultaneously with lowering the boom to the next cut level, the return swing and boom lowering can be performed concurrently to minimise cycle time.
The excavator’s digging cycle is the fundamental production unit. The number of cycles per hour, determined by cycle time and the machine’s payload per cycle, determines the machine’s hourly output in cubic metres. Minimising cycle time through correct positioning, smooth operation, and concurrent movements is the primary driver of excavator productivity.
Travelling on Site
Excavator travel, moving the machine from one position to another on the site, must be performed with the boom, stick, and bucket in the correct travel position: boom raised to provide ground clearance, stick curled in toward the machine, bucket curled in to minimise the forward projection of the working arm.
Travel with the boom low and the stick extended significantly raises the machine’s centre of gravity and forward weight bias, reducing stability and increasing the risk of tipping on uneven ground.
On slopes, travel up and down, not across the slope, whenever possible. Traversing a slope with a tracked excavator risks the machine sliding sideways and potentially rolling if the slope exceeds the machine’s rated traversing gradient. When digging must be conducted on a slope, position the machine to face up or down the slope rather than across it.
Approach road crossings, pipe crossings, culverts, and other buried structures with caution, the machine’s tracked undercarriage generates high ground pressures that can damage structures not designed for its weight.
Use a banksman, a ground worker positioned where they can see clearly and communicate with the operator, when travelling in areas with restricted visibility, near pedestrians, or in reversing manoeuvres. The excavator’s blind spots are significant, particularly directly behind and to the sides of the undercarriage, and a banksman is the most reliable control for preventing contact incidents with ground personnel.
Working Near Excavation Edges
Working at the edge of an excavation, the most common operational position for a trenching or basement excavation, requires specific awareness of the risk of edge failure and machine instability.
The excavator imposes significant load on the ground adjacent to the excavation through its tracks. This load, combined with the outward force of the bucket cutting into the excavation face, can cause the edge to shear and fail, taking the machine with it into the excavation. Keep the machine track at a safe standoff distance from the excavation edge, typically the greater of 1.0 metre or the excavation depth, adjusted for the actual ground conditions.
The bucket, when extended at depth below the machine’s track level, generates upward lift forces on the undercarriage if the bucket is used for breakout at full reach. Limit breakout force at depth and at maximum reach, use the machine’s weight conservatively rather than trying to generate maximum bucket breakout force in a marginal stability position.
Shutdown Procedure
At the end of the shift, or whenever the operator must leave the machine, follow the correct shutdown procedure:
Park the machine on firm, level ground where possible. Lower the boom, stick, and bucket so that the bucket rests flat on the ground with no load on the hydraulic cylinders. Allow the engine to idle for two to three minutes to cool the turbocharger before shutdown, stopping a turbocharged engine immediately from full load traps oil in the hot turbocharger bearing, causing coking and bearing damage.
Switch off all electrical loads, then shut down the engine. Confirm all controls are in the neutral position. Lock the cab. If the machine is to be left unattended on a public site, apply any additional security measures required by the site security plan, key removal, locking pins, or ground locking.
Excavator Safety: Key Rules Every Operator Must Follow
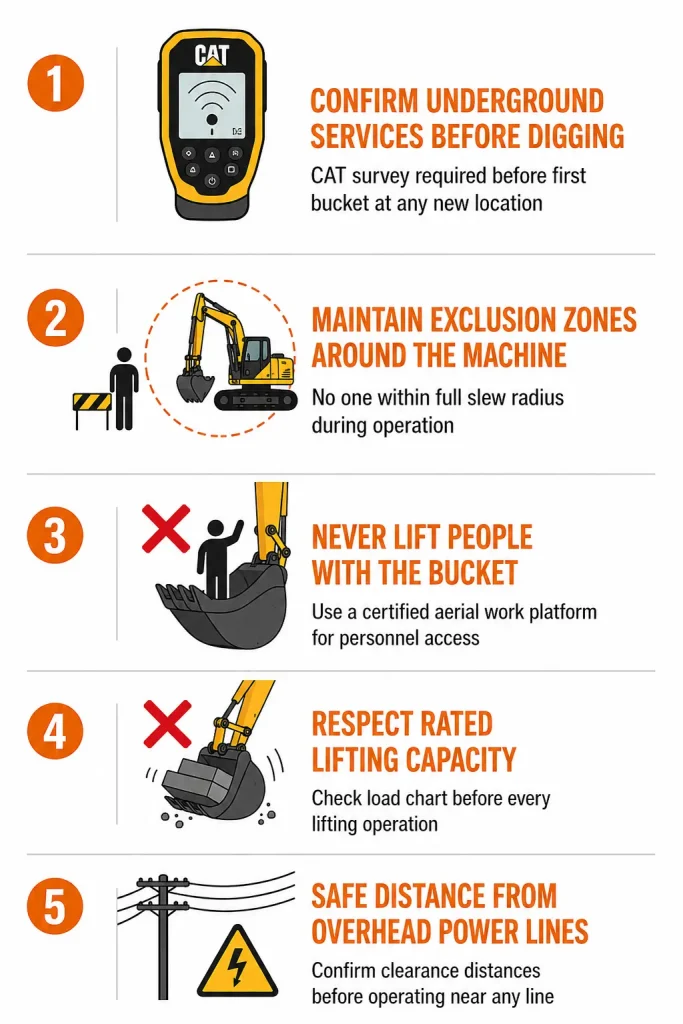
- Confirm underground services before digging
Before the first bucket enters the ground at any new location, the locations of all underground services, gas pipes, electricity cables, water mains, telecommunications cables, must be confirmed from records and by a cable avoidance tool (CAT) survey. A service strike can be fatal and is the most serious risk in excavation work.
- Maintain exclusion zones around the machine
The excavator’s slew arc sweeps a large area during normal operation. No person should be within the machine’s maximum slew radius during digging or loading operations. Exclusion zones must be physically demarcated and enforced, verbal instruction alone is not adequate.
- Never lift people with the bucket
The excavator bucket is not a personnel carrier. Lifting a person in the bucket, even briefly, even at low height, is prohibited under workplace safety regulations universally. For personnel access at height, a dedicated aerial work platform is the correct solution. The full range of aerial work platform types suited to access tasks on construction sites is covered in the guide to what a scissor lift is and when to use one versus other aerial work platforms.
- Respect rated lifting capacity
When the excavator is used for lifting, picking up precast elements, pipes, or other materials with a hook or lifting attachment, the machine’s rated lifting capacity at the relevant boom angle and radius must be confirmed before the lift. Lifting beyond rated capacity risks machine overturn. The load chart principles that apply to excavator lifting are directly comparable to those that govern crane operations.
- Maintain safe distances from overhead power lines
Excavator boom and stick movements can bring the working arm into contact with overhead power lines without the operator realising the risk. Safe clearance distances must be confirmed and enforced before any excavator operation near overhead lines.
The complete operational context for excavator types, crawler, wheeled, mini, long reach, and specialist variants, and their application across different ground conditions and site environments is covered in the complete guide to types of excavators and their capabilities on construction sites.
Also read : Types of Graders: How Each Works and When to Use One
Operate with Skill, Operate with Safety
Excavator operation is one of the most demanding and most consequential skills in the construction industry. A skilled, safety-conscious operator is one of the most productive people on any site, their machine output sets the pace for the earthworks programme, their truck loading keeps the haul fleet cycling, and their precision work defines the quality of the foundations and drainage that every subsequent phase builds on. That skill is earned through training, practice, and a genuine understanding of the machine and its environment.
RR Machinery provides a comprehensive range of construction and earthmoving equipment for sale and rental, including crawler excavators, wheeled excavators, and compact excavators across a wide range of operating weights, all maintained to full operational standard and supported by experienced equipment specialists. Explore our full range of construction and earthmoving equipment solutions, or contact our team for practical advice and a clear quotation matched to your project scope, ground conditions, and access requirements.